Hello Everyone! The project I am featuring today is a Halloween themed treat holder using the Stampin’ Up! Pretty Pillowbox dies. I presented this on my Facebook Live this past Tuesday and had a blast making it. You can fill it with whatever you would like, but I had candy in mind since it’s October and Trick or Treat season. If you’d like to catch my next live, you can follow me here. I go live each Tuesday at 7:30pm EST.

To start out, I used a black piece of the Metallic & Shimmer Specialty Paper, cut it down to 4.5” x 6”, and then used the Pretty Pillowbox largest die to cut out the box. When using this die, I found that it helps with the creasing if you run it through twice, remember to secure it to your plate though so it doesn’t shift during the first pass through. When you are assembling the box, be sure to fold on each scored mark securely and to match up the points of the semi circles on the side. The best adhesive for putting this box together is Tear n Tape. It is easy to use and holds securely.

After you have the base of the box together, you can move to finishing up the front. For this project’s main image, I used the Stampin’ Up! Bewitching cling stamp set with basic white ink on Orchid Oasis card stock, you only need a little big bigger scrap piece than the image has. The white ink is a pigment ink and works a little differently than the standard dye based inks. It needs a little bit more time to dry after you stamp your image. You are going to want to set it aside for a little bit before you try to adhere it to your project. To cut out the hat you can use the Witch Hat builder punch or fussy cut it out like me. If you plan to make more than a couple of these, I would absolutely recommend grabbing the punch so that you save your fingers and hands some pain and suffering 😆.

For the sentiment, I used the photopolymer stamp set that came in the Stampin’ Up! Spooky Treats September Paper Pumpkin in Orchid Oasis ink. I also used basic white cardstock and the small tag die from the Pretty Pillowbox dies to place the sentiment on, again you only need a scrap for this, a tad bigger than your tag die. I placed the hat onto the treat box with mini Stampin’ Dimensionals being sure to leave a little bit free by where I wanted to place the tag. Then I used a glue dot to sneak the tag underneath the side of the hat. For the finishing touch, I used the black stars that also came with the September Paper Pumpkin kit. If you are a current subscriber you can buy the past kit here. If you aren’t currently a subscriber see below for instructions on how to join!

These boxes of course were made with Halloween and Trick or Treating in mind, or for sending with your child into their classroom if needed, but they can be used for any sort of treat you like. Some ideas are, hair ties, barrettes, chapstick, jewelry, keychains, hand sanitizer or even AirPods! Of course you likely wouldn’t be handing AirPods out for Halloween, but you miiiiight be surprising someone with them come the holiday season.

Thank you for stopping by my blog, the measurements for this project were pretty minimal so I included them within the description of the project today. If you have any questions feel free to comment below , or contact me at Jillian@dyedwith.love. Don’t forget to send out those paper hugs in the mail!
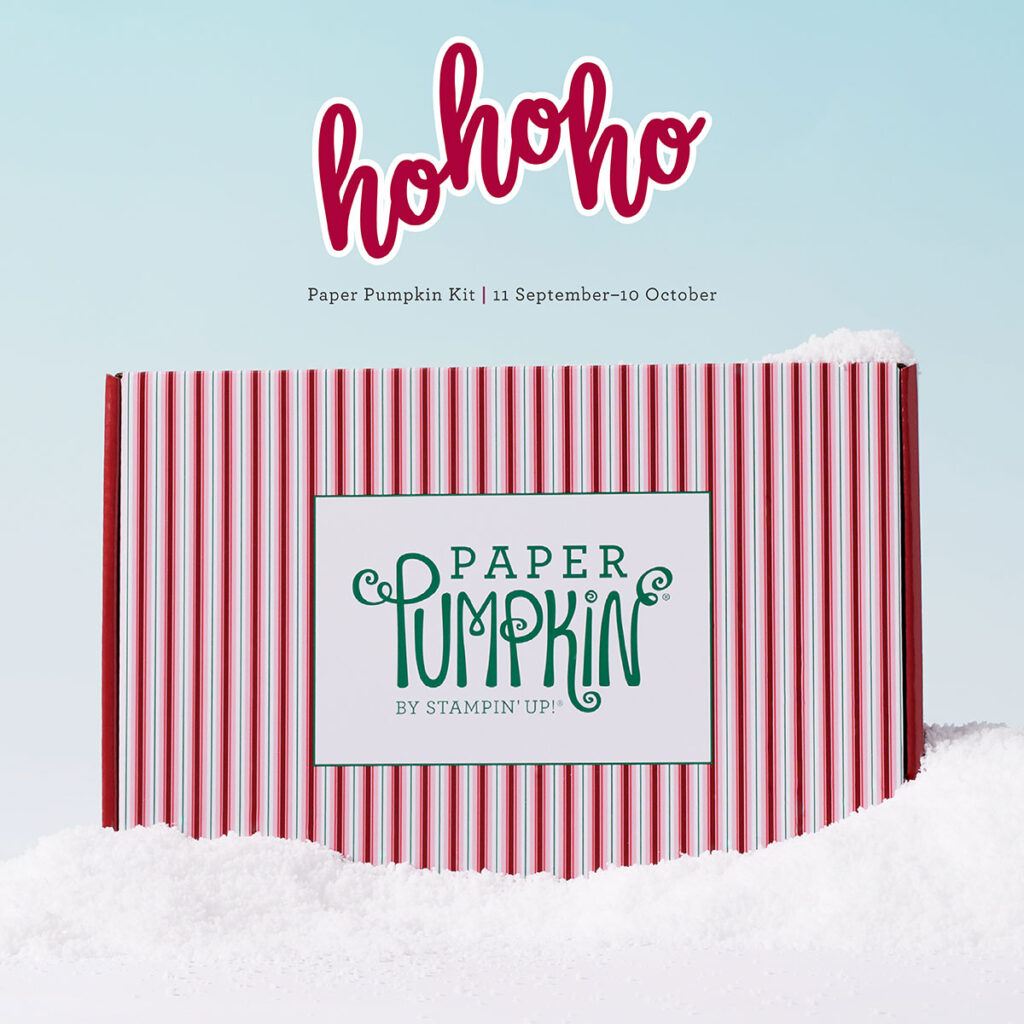
October’s Paper Pumpkin!
Tis the season to make your own Christmas cards with the Ho Ho Ho Paper Pumpkin Kit! This kit contains whimsical designs of Santa and his reindeer in a classic Christmas color palette which is sure to match various styles of holiday décor and look great on mantles everywhere.
Each kit contains enough supplies to create 9 festive cards—3 each of 3 designs—and 9 coordinating envelopes. These cards are sure to bring the warm holiday spirit.
And word from the North Pole is that this kit coordinates with next month’s Paper Pumpkin tag kit and the special add-on product! With so much coordination between products, you’ll have a breeze at creating a cohesive look for all your holiday gifting needs. Make this season the most wonderful time of the year for your loved ones—and for yourself!
If you would like to become a paper pumpkin subscriber click here! Paper pumpkin subscribers receive a paper crafting kit every month! You can cancel at any time as well as skip a month if you don’t think the kit is something you will use or enjoy. Don’t want to pay month to month? Ask me about a pre-paid option. These auto cancel after completion so you never have to worry about remembering if you stopped it or not.
Do you like kits but don’t want to subscribe to anything? Our Kit’s collection is perfect for you! Check out our newest addition to the collection. The Birthday Card Organizer Kit has everything you need to plan ahead and never forget another birthday again!
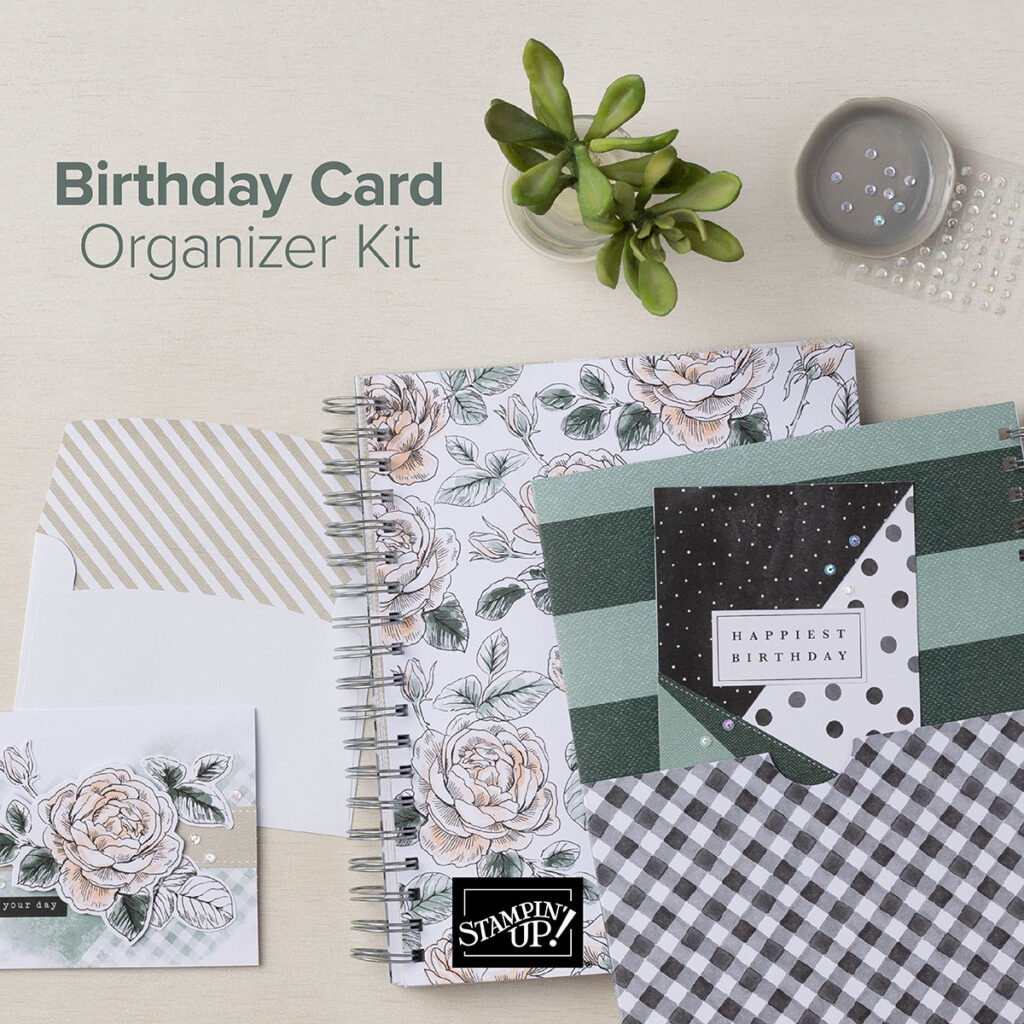
Details on the kit are as follows:
- Kit includes one 8″ x 10″ (20.3 x 25.4 cm) monthly planner with space to record birthdays each month as well as a pocket sleeve to hold birthday cards.
- Includes 12 full-size birthday cards, 6 of 2 designs, and 12 coordinating envelopes.
- Includes Glue Dots, Stampin’ Dimensionals, Adhesive-Backed Embellishments, and Tear & Tape Adhesive
- Includes die-cut florals and pieces ready for you to use—no prep work required!
- Includes sticker sentiments and die-cut labels in Dutch, English, French, and German
- Coordinating colors: Basic Black, Evening Evergreen, Petal Pink, Sahara Sand, and Soft Succulent
Order the kit here!
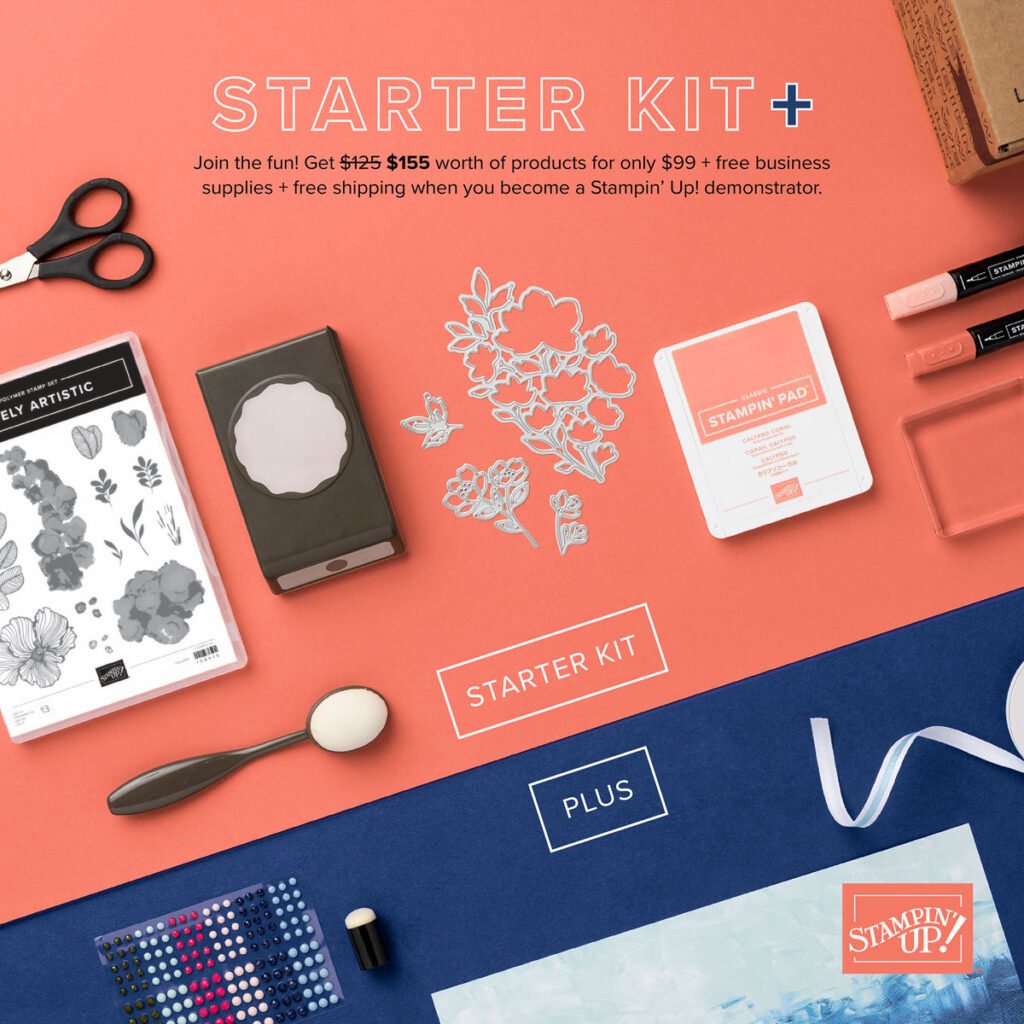
October is a great time to join Stampin’ Up!!!! If you join with me, you also become a part of Amy’s Inkin’ Krew and a member of the Art and Soul Team! Our fearless leaders, Amy and Jaimie are wonderful and talented crafters who offer so many fun activities and opportunities to learn, share, and even grab some free products. I will be here for you as well, if you just want to enjoy the discount thats perfectly and if you are interested in more I can help point you to some valuable resources to get you started out right. The 20% discount is great, but the people who I have met through this are even better, check it out! Contact me today with any questions you may have at Jillian@dyedwith.love